
Open public ports in Azure VM on a New Portal
Recently I needed to install a server (Octopus Deploy) for one of my clients. The obvious choice on where to host it was Microsoft Azure. I’ve done that many times, it’s super easy and I don’t have to beg admins for a VM and wait for ages, so I’ve done just that.
Octopus needs two nodes – one primary server which hosts the management web site and at least one slave node (they call it a Tentactle) which receives commands from the main node and executes it’s stuff. I wanted to host main website in Azure and apparently slave node on premise on customer side – that needs just one server which I alread have, to run my software. Beautiful.
I’ve created a new VM in the new portal, installed the software, fired up the web browser and it just works. Slave node was installed on premise and required a specific port open to poll the main server, which administrators kindly opened for me. The port had to be opened on Azure VM which I though is easy, I’ve done that many times. In the classic portal. And I’ve created the VM in the new portal. That’s where the fun begins.
In the classic portal opening a port is extremely easy, just navigate to the VM properties, click Endpoints, and add it, that just does it for you.
In new portal everything has changed, and we just couldn’t figure out in the first 5 minutes where to do it. When you create a “new style” VM Azure creates 4 resources by default:

- Virtual Machine – as the name implies it is the actual compute resource.
- Network Security Group – externally it’s very similar to Windows Firewall on Windows Server. It contains the list of ACLs that allow/deny traffic to your VM instances. NSG can be associated with either subnets or individual VM instances within the subnet. You can create NSG separately before creating the VM, and just keep adding VMs into NSG if they have same or similar security policies. For more information read here.
- Public IP Address – some kind of a resource which allocates a public IP address for your VM.
- Network Interface – describes the actual network interface for you VM. There is not much to configure here.
The most important resource for us is NSG, where all the policies are defined. Choosing it reveals the holy dialog where you can configure everything you could in the Classic Portal:
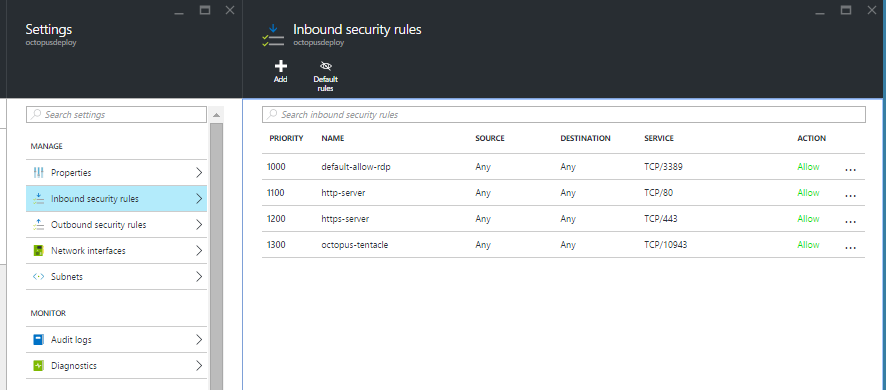
The first default rule for RDP is always precreated for you, which sort of gives you an example how they should be configured. It’s required so that after creating the VM you can remotely log in to it. The rule can be modified to further restrict remote access from specific subnets etc. which I find useful in places. We have added HTTP(S) incoming endpoints and the custom Octopus port 10943 as inbound rule hoping it will just work, but it didn’t!
Which is actually a good thing. NSG rules apply to a virtual hardware in your network, very similar to what you would do on a home router to enable incoming connections on a specific port. A good OS has firewalls enabled by default which block most of the access. Therefore the next thing you should do is RDP to your VM, open firewall settings, and add same rules to exception lists as well:
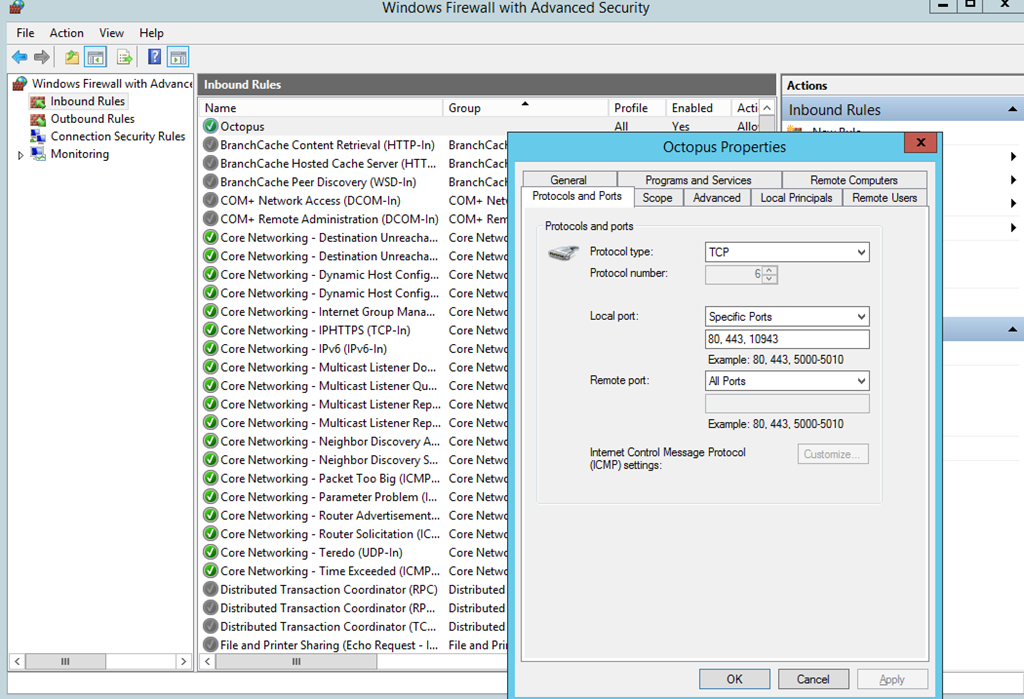
After that, all started working just fine.
To be honest, I do prefer the new way of configuring access comparing to the Classic Portal. You could do these tasks much easier, however it wasn’t as flexible as the new style VMs. Imagine scenarios you can achieve with mixing NSGs, Virtual Networks, interfaces etc. It’s a full blown security administrator console.
To contact me, send an email anytime or leave a comment below.