
Tips and Tricks for using Python with Databricks Connect
Last updated: 2021-04-29 - correct version numbers to modern.
Databricks Connect is awesome. It makes development for Apache Spark a joy. Without it I’d probably never be any effective and abandon Spark a long time ago.
Why
Databricks Connect is a magical local instance of Spark. Your machine will think it’s using local installation of Spark, however in reality it will use a remote Databricks instance. Why would you want it? Because often you need access to large datasets that don’t fit on your machine, and often you need bigger compute clusters to work with data.
Traditionally, it is possible to achieve it by having some small subsets of data locally and crunching through them, then deploying remotely to execute on a different dataset, but that’s not always possible, depending on the data you work with.
Installing
I assume you have already installed Miniconda (or Anaconda if you don’t care about your PC) and you can follow basic steps in the official Databricks Connect docs.
I also assume you’ve installed Jupyter. If not, install from conda - conda install -c conda-forge notebook. I recommend installing this in your base environment.
Download and install JDK 8 if you haven’t already. Don’t use higher versions as Spark is running under Java 8. Also make sure that you are installing x64 version of the SDK. Add bin to PATH, and create JAVA_HOME environment variable. On windows this usually looks like:
PATH=C:\Program Files (x86)\Java\jdk1.8.0_261\bin
JAVA_HOME=C:\Program Files (x86)\Java\jdk1.8.0_261
Create Conda environment with python version 3.7 and not 3.5 like in the original article (it’s probably outdated):
conda create --name dbconnect python=3.7
In general, the minor version of your client Python installation must be the same as the minor Python version of your Databricks cluster. The table shows the Python version installed with each Databricks Runtime.
| Databricks Runtime version | Python version |
|---|---|
| 8.1 ML, 8.1 | 3.8 |
| 7.3 LTS ML, 7.3 LTS | 3.7 |
| 6.4 ML, 6.4 | 3.7 |
| 5.5 LTS ML | 3.6 |
| 5.5 LTS | 3.5 |
Activate the environment
conda activate dbconnect
and install tools v3.7 (version should correspond to cluster runtime version):
pip install -U databricks-connect==7.3.*
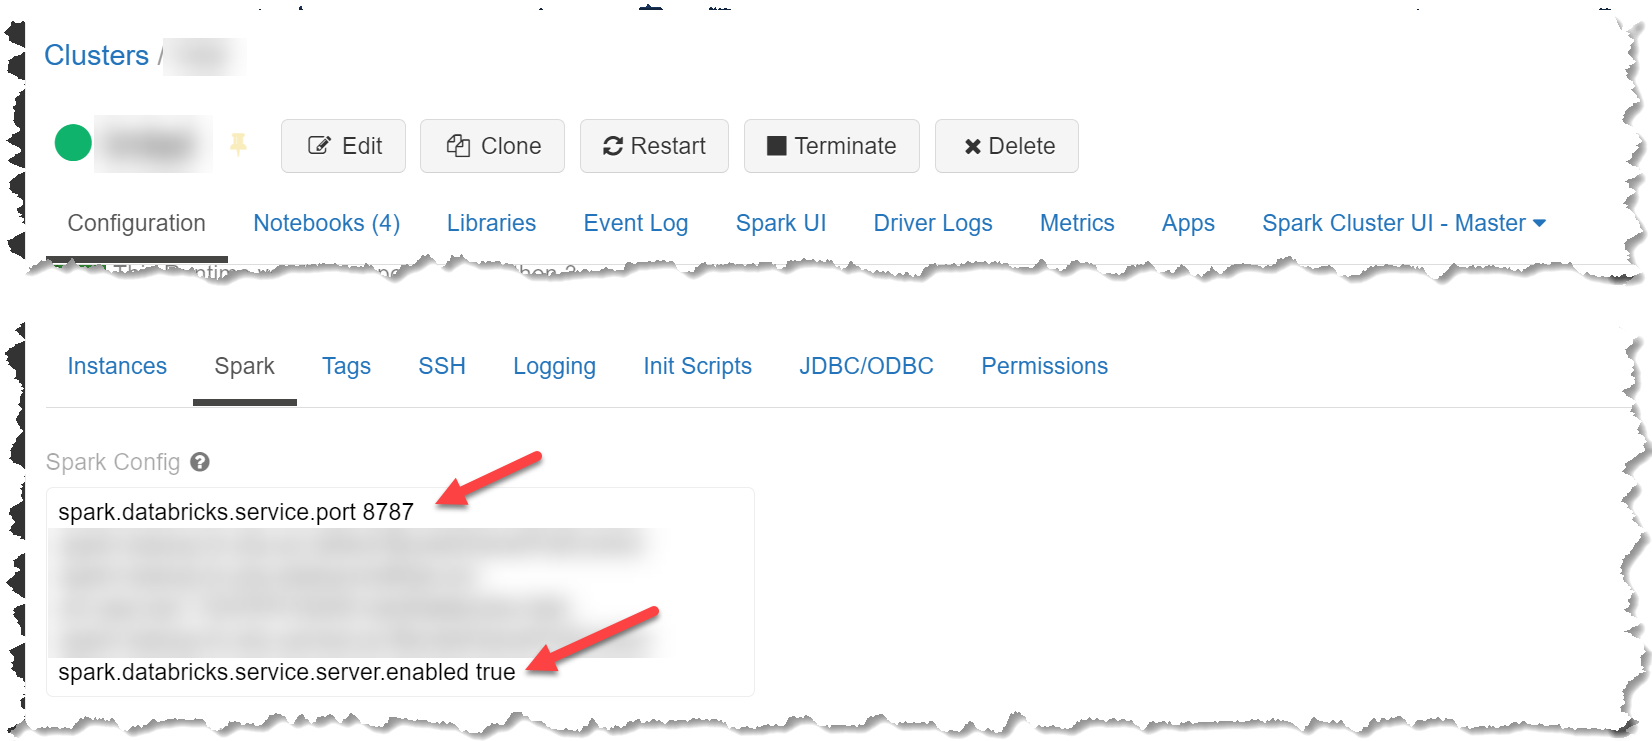
Your cluster needs to have two variable configured in order for Databricks Connect to work:
spark.databricks.service.server.enabledneeds to be set totruespark.databricks.service.portneeds to be set to a port (you need this later).
You should be able to use Databricks Connect now from IDE you want.
Jupyter Weirdness
I like to have Jupyter installed in my base conda environment once, and not duplicated across all the environments I’m creating. If this is the case, when you run Jupyter server, it won’t display the newly created environment for Databricks Connect, as it doesn’t pick up new environments automatically.
To solve this, install ipykernel (Jupyter kernel integration) into Databricks Connect environment:
conda install ipykernel
Instruct Jupyter that current environment needs to be added as a kernel:
python -m ipykernel install --user --name dbconnect --display-name "Databricks Connect (dbconnect)"
Go back to the base environment where you have installed Jupyter and start again:
conda activate base
jupyter kernel
The kernel will be displayed in the list.
Jupyter Hints
You can enable automatic DataFrame display functionality by setting spark.conf.set("spark.sql.repl.eagerEval.enabled", True).
There are extensions available you can install to extend Jupyter functionality.
To customise Jupyter look&feel, use this repository.
Using Multiple Databricks Clusters
Once databricks-connect is configured from the command line by specifying all the parameters, including cluster id, you are tied to that cluster, unless it’s reconfigured again. To use a different cluster, a new conda environment can be created, and configured again. However, if all of your clusters are in the same databricks workspace, you can use the following trick to switch between clusters.
First, create a cluster map somewhere in code:
clusters = {
    "dev": {
        "id": "cluster id",
        "port": "port"
    },
    "prod": {
        "id": "cluster id",
        "port": "port"
    }
}
Write a function that you can call from your notebook:
def use_cluster(cluster_name: str):
    """
    When running via Databricks Connect, specify to which cluster to connect instead of the default cluster.
    This call is ignored when running in Databricks environment.
    :param cluster_name: Name of the cluster as defined in the beginning of this file.
    """
    real_cluster_name = spark.conf.get("spark.databricks.clusterUsageTags.clusterName", None)

    # do not configure if we are already running in Databricks
    if not real_cluster_name:
        cluster_config = clusters.get(cluster_name)
        log.info(f"attaching to cluster '{cluster_name}' (id: {cluster_config['id']}, port: {cluster_config['port']})")

        spark.conf.set("spark.driver.host", "127.0.0.1")
        spark.conf.set("spark.databricks.service.clusterId", cluster_config["id"])
        spark.conf.set("spark.databricks.service.port", cluster_config["port"])
Pass cluster name from the map to use_cluster - this will select an appropriate cluster before executing the code. The good thing about it is you can leave the call in Databricks notebook, as it will be ignored when running in their environment.
Local vs Remote
Checking if notebook is running locally or in Databricks
The trick here is to check if one of the databricks-specific functions (like displayHTML) is in the IPython user namespace:
def _check_is_databricks() -> bool:
    user_ns = ip.get_ipython().user_ns
    return "displayHTML" in user_ns
Getting Spark Session
Databricks notebooks initialise spark variable automatically, therefore you can decide whether to return it or create a new local session:
def _get_spark() -> SparkSession:
    user_ns = ip.get_ipython().user_ns
    if "spark" in user_ns:
        return user_ns["spark"]
    else:
        spark = SparkSession.builder.getOrCreate()
        user_ns["spark"] = spark
        return spark
Faking Display Function
Databricks has a nice display() function that renders dataframes. We don’t have that locally, but we can fake it:
def _get_display() -> Callable[[DataFrame], None]:
    fn = ip.get_ipython().user_ns.get("display")
    return fn or _display_with_json
DBUtils
Depending where you run, you can create a local instance of dbutils or get pre-initialised one when running in Databricks:
def _get_dbutils(spark: SparkSession):
    try:
        from pyspark.dbutils import DBUtils
        dbutils = DBUtils(spark)
    except ImportError:
        import IPython
        dbutils = IPython.get_ipython().user_ns.get("dbutils")
        if not dbutils:
            log.warning("could not initialise dbutils!")
    return dbutils
Putting it all Together
You can put all of the above in a single python file, reference it from every notebook, and they will work regardless where you run:
dbconnect.py:
from typing import Any, Tuple, Callable

from pyspark.sql import SparkSession, DataFrame
import logging
import IPython as ip
from pyspark.sql.types import StructType, ArrayType
import pyspark.sql.functions as f

clusters = {
    "dev": {
        "id": "cluster id",
        "port": "port"
    },
    "prod": {
        "id": "cluster id",
        "port": "port"
    }
}

# Logging

class SilenceFilter(logging.Filter):
    def filter(self, record: logging.LogRecord) -> int:
        return False


logging.basicConfig(format="%(asctime)s|%(levelname)s|%(name)s|%(message)s", level=logging.INFO)
logging.getLogger("py4j.java_gateway").addFilter(SilenceFilter())
log = logging.getLogger("dbconnect")

def _check_is_databricks() -> bool:
    user_ns = ip.get_ipython().user_ns
    return "displayHTML" in user_ns


def _get_spark() -> SparkSession:
    user_ns = ip.get_ipython().user_ns
    if "spark" in user_ns:
        return user_ns["spark"]
    else:
        spark = SparkSession.builder.getOrCreate()
        user_ns["spark"] = spark
        return spark


def _display(df: DataFrame) -> None:
    df.show(truncate=False)


def _display_with_json(df: DataFrame) -> None:
    for column in df.schema:
        t = type(column.dataType)
        if t == StructType or t == ArrayType:
            df = df.withColumn(column.name, f.to_json(column.name))
    df.show(truncate=False)


def _get_display() -> Callable[[DataFrame], None]:
    fn = ip.get_ipython().user_ns.get("display")
    return fn or _display_with_json


def _get_dbutils(spark: SparkSession):
    try:
        from pyspark.dbutils import DBUtils
        dbutils = DBUtils(spark)
    except ImportError:
        import IPython
        dbutils = IPython.get_ipython().user_ns.get("dbutils")
        if not dbutils:
            log.warning("could not initialise dbutils!")
    return dbutils


# initialise Spark variables
is_databricks: bool = _check_is_databricks()
spark: SparkSession = _get_spark()
display = _get_display()
dbutils = _get_dbutils(spark)


def use_cluster(cluster_name: str):
    """
    When running via Databricks Connect, specify to which cluster to connect instead of the default cluster.
    This call is ignored when running in Databricks environment.
    :param cluster_name: Name of the cluster as defined in the beginning of this file.
    """
    real_cluster_name = spark.conf.get("spark.databricks.clusterUsageTags.clusterName", None)

    # do not configure if we are already running in Databricks
    if not real_cluster_name:
        cluster_config = clusters.get(cluster_name)
        log.info(f"attaching to cluster '{cluster_name}' (id: {cluster_config['id']}, port: {cluster_config['port']})")

        spark.conf.set("spark.driver.host", "127.0.0.1")
        spark.conf.set("spark.databricks.service.clusterId", cluster_config["id"])
        spark.conf.set("spark.databricks.service.port", cluster_config["port"])
In your notebook:
from dbconnect import spark, dbutils, use_cluster, display

use_cluster("dev")

# ...

df = spark.table("....")	# use spark variable

display(df)	# display DataFrames

# etc...
Fixing Out-of-Memory Issues
Often when using Databricks Connect you might encounter an error like Java Heap Space etc. etc. etc.. This simply means your local spark node (driver) is running out of memory, which by default is 2Gb. If you need more memory, it’s easy to increase it.
First, find out where PySpark’s home directory is:
❯ databricks-connect get-spark-home
c:\users\ivang\miniconda3\envs\hospark\lib\site-packages\pyspark
This should have a subfolder conf (create it if it doesn’t exist). And a file spark-defaults.conf (again, create if doesn’t exist). Full file path would be c:\users\ivang\miniconda3\envs\hospark\lib\site-packages\pyspark\conf\spark-defaults.conf. Add a line
spark.driver.memory 8g
Which increases driver memory to 8 gigabytes.

Monitoring Jobs
Unfortunately, I couldn’t find a good way to monitor jobs from DBC environment. There’s Big Data Tools plugin for IntelliJ, that in theory supports Spark job monitoring, and considering DBC runs a virtual local cluster, I though it would work. However, no luck in any configuration.
The best way to monitor jobs I found is to use Spark UI from the cluster on Databricks you’re connected to, probably because that’s where they are actually running.
Em, excuse me! Have Android 📱 and use Databricks?
You might be interested in my totally free (and ad-free) Pocket Bricks . You can get it from Google Play too:
![]()
To contact me, send an email anytime or leave a comment below.